bottom drains

whiskey

Always trying to perfect something fishy
Joined
Jul 1, 2011
Messages
594
Reaction score
100
Location
mildenhall, suffolk,uk
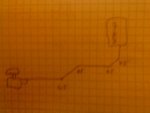
hi guys are there any pit falls when installing bottom drain plumbing, as i dont want air pockets.
I hope to run straight pipework from b/drain to a 45* angle fitting then onto another 45* angle fitting, but this section of pipe will be offset to climb approx. 15" inches before reaching the final fitting of 90* to go to sieve unit. see diagram.
 

Attachments

  • DSC00777.JPG
    DSC00777.JPG
    19.7 KB · Views: 328

fishin4cars

True friends just call me Larkin
Joined
Mar 23, 2011
Messages
5,195
Reaction score
1,601
Location
Hammond LA USA
Hardiness Zone
8a
Whisky, You want to avoid 90's as much as possible, even when you have to install the 45's you want to use long sweeping 45's not the short ones. a key poit is the lowest run of pipe needs to be level with no belly or hump. this will help stop a air lock in the pipe. The flush drain should be installed for best use just before you start turning up for the filter pit/ sieve filter, etc. The tee and valve assembly can be sliightly smaller than the actual drain line, so if you were to run a 4" inch BD line then you can install a tee and drop down to 3" if you want. The pressure from the pond as long as the valves are lower than the bottom of the pond will have enough push to flush out the lines. One thing I do recommend is installing two vales at that point, one knife valve, one ball valve. the reason for this is ball valves are more easy to control the flow rate where the knife valve is more a positive shut off. Nothing worse in that circuit than a leaking valve! It may seem like a waste of money to have two valves for the drain, but if you need it it will be priceless to have it installed!
 
Joined
Apr 10, 2010
Messages
3,214
Reaction score
1,299
Location
Phoenix AZ
Sounds like you understand the importance of not having spots for trapped air. Then it's just the detail of checking when back filling.

Testing
Testing the drain, always a good idea, rarely done I think. You can buy these kinds of plugs pretty cheap. They're not great, don't hold much pressure, but enough. Plug the drain and fill the pipe with water and see what happens. Not a great test, but you'll catch big problems like a joint that didn't get glued. Think it won't happen? Shocking how often...but I checked it, twice. Pressurized air is the best test but more complex. Lots of info on the web for that.

Flush valves
I like simple. I don't think flush valves have much use. Generally, if there's a problem, it will be string algae clogging or even sand collecting in the pipe. Depending on the elevation of the flush the force of water can be kind of weak, especially if already clogged. For example, if the flush is 3' below it's current outlet in the sieve you're only gaining 3' of head, not a lot of force. I prefer sticking a garden hose down the drain from the sieve and blowing out the drain that way. You can get small brass nozzles that go on the end of a hose, which are used to cut through soil. Very powerful. I've also heard of people using compressed air. I once used a plumbing snake to clear a real mess.

Make your own sweeps
You might think this is crazy but I make my own sweeps. It's surprisingly easy and you get the exact turn you want, very smooth. Saves some money too, those 4" 45s run about $20.

To make a sweep I cut the length needed and duct tape one end closed. A cheap drain pipe cap works too, they're cheaper than PVC. You can also use the plug I mentioned earlier, if you're going to test.

Heat up some sand in a pan, or actually several pans. You can measure the amount of sand needed using the target pipe. I heat the sand in a fire, nothing fancy, regular camp fire. The sand doesn't need to get that hot, and you don't want it too hot, about 250F. Hotter is not better. It only takes a few minutes in a good fire.

Pour the hot sand in the pipe and in a few seconds the pipe is like cooked spaghetti. Lay it in the trench, which must be the basic needed shape. Pour water on the pipe for bit, and when firm pull it out and dump the sand right away so it doesn't heat the pipe back up.

I've seen people use torches to make shallow bends, big torches and several going at once, but a little tricky for sweep, The pipe can collapse when bent with a torch. Sand pushes outward and the pipe keeps its shape better.

All the bells and whistles
To form the bell ends heat about 8" of sand in a pot. When hot enough, maybe 275F, shove one end of the pipe into the sand. Get the PVC good and loose. Take it out and rub a wooden stick around the pipe's inside to start a flare. The PVC keeps wanting to go back, but you'll get it. Get enough flare so it'll go over another piece of pipe, a short piece is fine. Then just keep rotating and pushing and you'll get a perfect bell. Cool with water and pull off. Repeat for other end.

Best to make the bells after the sweep. I make the sweep a bit long and cut to length when ready. Instead of making bells you can of course use couplers, but those do have twice the gluing, easy to get a leak with 4" pipe. So I like the bells. Plus they're cool to make.

I said sand, and it does work, but I normally just use dirt if dry and loose.

I also do this with return lines. It's easier with smaller diameter pipe, you can do longer lengths.

Here a video of PVC bending, although this is just 3/4" pipe you'll get the idea.


whiskey

Always trying to perfect something fishy
Joined
Jul 1, 2011
Messages
594
Reaction score
100
Location
mildenhall, suffolk,uk
thanks waterbug much appreciated . Because my main pond is split level ie most of pond above ground [retained by by concrete blocks] only got 2ft beow ground hence the need to get bottom drain correct. If my thinking is correct, fitting a flush pipe has to be as low as possible, to be able to flush b/d pipe as close to box as possible thus draining pipe from sieve also, hopefully drawing muck from b/d sump box as it empties.
So im guessing the " tee fitment " has to be around about 1 foot away from drain to get a good draw/suck from b/d sump box once the flush system is opened.
 

Attachments

  • DSC00781.JPG
    DSC00781.JPG
    21.8 KB · Views: 256

whiskey

Always trying to perfect something fishy
Joined
Jul 1, 2011
Messages
594
Reaction score
100
Location
mildenhall, suffolk,uk
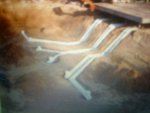
Hi guys being my pond is part below ground and above in brick, can i diagonal step from b/d to sieve or would this be wrong.
 

Attachments

  • DSC00785.JPG
    DSC00785.JPG
    23 KB · Views: 287

fishin4cars

True friends just call me Larkin
Joined
Mar 23, 2011
Messages
5,195
Reaction score
1,601
Location
Hammond LA USA
Hardiness Zone
8a
Whiskey, I'm not sure how to post drfawings and really I think Waterbug has far more experience in this than I do. I've been reading through Waterbugs posts as well as I'm going to be starting my build later this spring. It will be the first B/D I've done as a actual part of the filter, My only other experience I used the B/D as a drain and a way to help remove muck that accumalated. But it was not part of the filter system.
 

whiskey

Always trying to perfect something fishy
Joined
Jul 1, 2011
Messages
594
Reaction score
100
Location
mildenhall, suffolk,uk
thanks larkin , found this on web.... looks like i can use diagonal pipework, will save me lot of work, [got concerns over air pockets]
 

Attachments

  • DSC00787.JPG
    DSC00787.JPG
    27.8 KB · Views: 307
Joined
Apr 10, 2010
Messages
3,214
Reaction score
1,299
Location
Phoenix AZ
As long as every bit slopes up, or at least level, you can make as many turns as you like as far as air pockets are concerned. You already understand the downside of needless turns of course.

If you really wanted air pocket peace of mind you can attach a riser pipe to the bottom drain up to the expected water level. Then fill the riser with water. Simulates a full pond without the liner. If you have air pockets the outlet (also at or a little above waterline) will not fill as much as expected. The water level in the riser and in the outlet should be exactly equal. You check that with your water level, an essential tool for pond building. Also not a bad way to check for leaks.

I don't know your drain, but they make rubber 4" pipe fittings for waste lines which have hose clamps. Easy to make a water tight connection and then remove. You do have to use some 2x4s (wood, I don't know if 2x4 is a term you all use) to brace the riser.

IMO any test should be done after the drain pipe has been covered in dirt and the dirt tamped under the pipe. The weight of the pond will be pressing the pipe into the ground so you really want good solid ground under the pipe. It will still sink some, but you want to minimize that with good tamping. I use a regular hammer. You can't go too crazy, else the more you pound the pipe just pushes up. Standing on the pipe while tamping works good.
 

whiskey

Always trying to perfect something fishy
Joined
Jul 1, 2011
Messages
594
Reaction score
100
Location
mildenhall, suffolk,uk
thanks waterbug, with your comments and searching the web, i now feel, ok to tackle it, would of liked to go, straight from b/d to under sieve, in one run, but happy to make sloping ascent as drawing to sieve..........thanks again
 

whiskey

Always trying to perfect something fishy
Joined
Jul 1, 2011
Messages
594
Reaction score
100
Location
mildenhall, suffolk,uk
JUST HAD EMAIL FROM MATE ...THE TEE GOES TO SIEVE/FILTER [RISING] AND THE INLINE GOES TO DRAIN OFF OR WASTE PIT, INCASE IT BLOCKS....................SIMPLE ERRR......HAD A BLONDE MOMENT.
 
Joined
Feb 11, 2012
Messages
9
Reaction score
0
Location
Eastern Washington, USA
I'll be installing a bottom drain "After the fact", planning on drilling 1/4 holes along the top and sides of 1-1/2in black PVC, then laying the piping all around the bottom of the pond's floor, then connect the pipe that leads to a 2500 GPH pump, which will bring the water to 3 55-Gal drums fill with various filtering elemets then back into the waterfall. Of course puttting in the T's so I can stop and drain/clean periodically the drums etc....
 

whiskey

Always trying to perfect something fishy
Joined
Jul 1, 2011
Messages
594
Reaction score
100
Location
mildenhall, suffolk,uk
Thats cool, but you know your still have muck on the bottom layer [ the last 1" ] or just under pipe height. .....bottom drain ...refers to drain with sloping sides to suck waste from ponds bottom at the lowest point.
Any pipework at that level will help but will be limited to area of pipe [ loss of draw/suck ]
 

Ask a Question

Want to reply to this thread or ask your own question?

You'll need to choose a username for the site, which only take a couple of moments. After that, you can post your question and our members will help you out.

Ask a Question

Members online

No members online now.

Forum statistics

Threads
31,557
Messages
518,857
Members
13,801
Latest member
BeckyWestw

Latest Threads

Top