- Joined
- Apr 19, 2012
- Messages
- 10
- Reaction score
- 1
I'm midway through a pond build and thought that I'd share. My wife and I wanted a pond for quite a while to do several things - have a waterfall to compete with traffic noise, give our young daughter (6 months!) a place to explore and splash around in as she grows up, and of course a place for us all to relax in the evenings. We wanted a medium sized pond that fit into our very wild backyard that is completely wooded and frequented by deer, owls, etc. Our original goal was an 11x14' pond with a max of 3' of depth (around 1800 gallons total) that would have lots of plants and some "semi-natural" species of fish (we don't want koi), frogs, turtles, etc. We live in an area where the big spotted salamanders migrate each spring so I'm hoping they'll even make it a home eventually.
Didn't need to put a lot of thought into the location. There was only one spot where we could fit a pond:
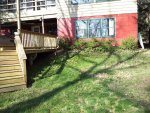
We wanted it right next to our deck. The location is viewable from large windows upstairs and downstairs in addition to the deck and the upstairs enclosed patio - lots of different angles! We also plan for the rockwork and plants to screen the ugly underside of the deck. The main drawback is that we have a very wooded backyard so it might be too shaded and will accumulate a lot of debris. The location receives filtered sun throughout the morning and about 2-3 hours of intense sun in the early afternoon. Hopefully that will support lilies, even if they don't flower much. I planned for an oversized pump and filter to help with the extra bioload from the trees.
The slope was a major challenge and ended up really constraining the build. The total change in elevation across the pond site was ~ 4 feet, great for a natural looking waterfall area, but rough when it came to digging. We had to dig a lot of dirt just to get to the water surface on one side! We eventually added a shallow retaining wall on the downhill side and are still figuring out how to make it look really natural. You can see how we plan to layer rock in front of the paving stone wall and hopefully top it with flagstone or something similar so that the wall becomes a seating area. That gave us an extra ~8 inches of depth but I still had trouble with the uphill side decided to add more terracing to maintain stability - this ate into the size and depth of the pond.
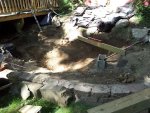
Because the pond is in a corner, against the deck and the house, the waterfall area is really hard to get too so I decided to build it up as much as possible early in the process. You can see our filter falls in place here. The water will cascade straight out then be pushed right (in the photo) through two small cascades before dumping into the right side of the pond, next to the granite boulder. At this point, I also moved a few boulders to temporary holding spots next to the deck because they were too large to move once the pond was filled.
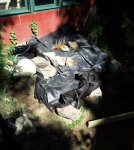
I like bogs and planned to have to medium-sized ones, but quickly ran out of room. Instead, I'll have three tiny "bogs", each built differently. The bag of pea gravel is in a 6 sq foot depression that will be fed by RO water runoff. I make about 30 gallons of reverse osmosis water each week for my reef tank and I plan for the waste water to feed this bog. Thus it will get really wet each weekend with an influx of 30 gallons, with the excess gradually draining down into the pond. There is a pipe in the lower left that will feed a traditional upflow bog, once plumbed, and a small secondary waterfall back into the pond. The third "bog" is simply a passive bog on the side of the pond.
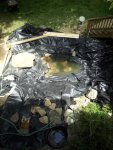
You can see the cinder block in the pond digging photo. This is to provide a foundation for "Ruby's rock", a large flat rock that protrudes into the pond to provide a spot for our daughter to lay on her belly and peer straight down into the water (okay it will be a couple of years until she grows enough for this!). This required some planning. The rock was heavy (600 pounds??) and we wanted it suspended right at water level so that fish could swim underneath. There is a concrete foundation under the cinder block and a concrete foundation on the shore to hold the weight. My heroic wife and I managed to maneuver the rock to pond the morning after we added our liner, then disaster. The rock slipped and smashed my thumb. After a trip to the hospital to assure my wife that it wasn't broken, we devised a plan to finish placing the rock by using 2x4s as levers. With help from my sister-in-law and her fiance, we finished the job! I still have to trim away some of the excess padding hanging out from under the rock and I plan to apply concrete to the cinder block to better camouflage it, but I am pleased...

Finally, it is time to start filling and adding rock!
Didn't need to put a lot of thought into the location. There was only one spot where we could fit a pond:

We wanted it right next to our deck. The location is viewable from large windows upstairs and downstairs in addition to the deck and the upstairs enclosed patio - lots of different angles! We also plan for the rockwork and plants to screen the ugly underside of the deck. The main drawback is that we have a very wooded backyard so it might be too shaded and will accumulate a lot of debris. The location receives filtered sun throughout the morning and about 2-3 hours of intense sun in the early afternoon. Hopefully that will support lilies, even if they don't flower much. I planned for an oversized pump and filter to help with the extra bioload from the trees.
The slope was a major challenge and ended up really constraining the build. The total change in elevation across the pond site was ~ 4 feet, great for a natural looking waterfall area, but rough when it came to digging. We had to dig a lot of dirt just to get to the water surface on one side! We eventually added a shallow retaining wall on the downhill side and are still figuring out how to make it look really natural. You can see how we plan to layer rock in front of the paving stone wall and hopefully top it with flagstone or something similar so that the wall becomes a seating area. That gave us an extra ~8 inches of depth but I still had trouble with the uphill side decided to add more terracing to maintain stability - this ate into the size and depth of the pond.

Because the pond is in a corner, against the deck and the house, the waterfall area is really hard to get too so I decided to build it up as much as possible early in the process. You can see our filter falls in place here. The water will cascade straight out then be pushed right (in the photo) through two small cascades before dumping into the right side of the pond, next to the granite boulder. At this point, I also moved a few boulders to temporary holding spots next to the deck because they were too large to move once the pond was filled.
I like bogs and planned to have to medium-sized ones, but quickly ran out of room. Instead, I'll have three tiny "bogs", each built differently. The bag of pea gravel is in a 6 sq foot depression that will be fed by RO water runoff. I make about 30 gallons of reverse osmosis water each week for my reef tank and I plan for the waste water to feed this bog. Thus it will get really wet each weekend with an influx of 30 gallons, with the excess gradually draining down into the pond. There is a pipe in the lower left that will feed a traditional upflow bog, once plumbed, and a small secondary waterfall back into the pond. The third "bog" is simply a passive bog on the side of the pond.

You can see the cinder block in the pond digging photo. This is to provide a foundation for "Ruby's rock", a large flat rock that protrudes into the pond to provide a spot for our daughter to lay on her belly and peer straight down into the water (okay it will be a couple of years until she grows enough for this!). This required some planning. The rock was heavy (600 pounds??) and we wanted it suspended right at water level so that fish could swim underneath. There is a concrete foundation under the cinder block and a concrete foundation on the shore to hold the weight. My heroic wife and I managed to maneuver the rock to pond the morning after we added our liner, then disaster. The rock slipped and smashed my thumb. After a trip to the hospital to assure my wife that it wasn't broken, we devised a plan to finish placing the rock by using 2x4s as levers. With help from my sister-in-law and her fiance, we finished the job! I still have to trim away some of the excess padding hanging out from under the rock and I plan to apply concrete to the cinder block to better camouflage it, but I am pleased...

Finally, it is time to start filling and adding rock!


